Saturday, June 29, 2013

Open VCD in GTKWave from Vivado HLS GUI

When Vivado HLS (VHLS) runs C/RTL cosimulation using SystemC model with "Dump Trace" option, VCD files are created with simulation waveforms.


VHLS GUI does not have a built-in waveform viewer. This blog shows how to "integrate" GTKWave, one of popular and free waveform viewers, into VHLS GUI  so that the generated VCD file can be opened in GTKWave by double-clicking the file in VHLS GUI on a Win7 machine.

Install gtkwave on Win7
  • Download gtkwave.exe.gz and all_libs.tar.gz from http://www.dspia.com/gtkwave.html
  • Unzip gtkwave.exe.gz to c:\tools\gtkwave
  • Unzip all_libs.tar.gz to c:\tools\gtkwave\lib
  • Add c:\tools\gtkwave to PATH environment variable (A nice utility Rapid Environment Editor can be handy)
  • Add C:\tools\gtkwave\lib\bin to PATH environment variable
  • Set gtkwave.exe to “Run As Administrator (see the snapshot on the next slide). This is required to run gtkwave from VHLS GUI


Create Batch File to Open VCD in gtkwave
  • Create a batch file open_vcd_gtkw.bat
  • Add the lines below and save it
     REM open the VCD file in gtkwave
     set vcd=%~f1
     cd %~d1%~p1
     C:\tools\gtkwave\gtkwave %vcd%
  • Associate .vcd file with open_vcd_gtkw.bat from Windows Explorer (see below).
  • VCD file can now be opened in gtkwave from VHLS GUI by double clicking on it. User Access Control window will pop up during opening the file, click OK to continue

File Association on Windows
  • .vcd is used as an example. Apply to all extenstions.
  • In Windows File Explorer, right click vcd file
  • Select Open With…
  • Click Browse button to select open_vcd.batCreate a batch file open_vcd_gtkw.bat

Saturday, June 22, 2013

Xilinx Document Navigator Tips and Tricks

Xilinx Document Navigator (DocNav) has been out for over two years since I first blogged about it. It has become one of indispensable tools for my daily work. I hope everybody else feels the same way. There are a few tips&tricks I would like to share and hopefully they can be helpful to other users as well:
  • I always press "CTRL-F" to bring up "Find" box in Adobe Reader to search keywords. However, it doesn't come up if the "Find" box is already open in another PDF document. This is a limitation of Adobe Reader. The workaround is to right-click anywhere in the active PDF and select "Find".
  • If you don't want to download and keep >3GB documents all at once, check "Download Web-Based PDF Documents When First Opened" on the Settings Dialog to download and save documents on demand.
 
  • If the button to slide out "Document Tray" is lost for some reason, unmaximize the DocNav main window, then exit and reopen the application
  • Some PDFs are opened without Adobe tool bar by default (left window in the snapshot below). Hover the mouse over the center area at the bottom and a small tool bar will pop up. Click on the "Adobe" icon to turn on the tool bar for the document.

Sunday, May 26, 2013

Migrate SysGen Model in IDS to Vivado

Both IDS and Vivado Design Suite include System Generator (SysGen) for DSP. However, SysGen models created in IDS may not be compatible in Vivado because some design blocks in IDS SysGen may have different versions in Vivado or may not even be supported. SysGen in IDS 14.5/Vivado 2013.1 has a new "Model Upgrade" feature that will make migration of SysGen model from IDS to Vivado a lot easier. A couple of things to keep in mind when migrating:
  1. Vivado only supports 7 Series (Virtex7, Kintex7, Artix7), Zynq, and newer device families.
  2. Not all blocks om Xilinx BlockSet can be upgraded. Non-upgradable blocks need to be removed.
The migration is a two-step process:
  1. Run IDS SysGen: upgrades all blocks to the latest version in IDS SysGen. 
  2. Run Vivado SysGen: upgrade latest versions of all blocks in IDS SysGen to the latest versions in Vivado SysGen.
Upgrade Model in IDS SysGen:
  1. Open the model in IDS SysGen
  2. Open the "Properties" window of "System Generator". 
  3. Select a 7 series or Zyqn device is selected as the "Compilation" target
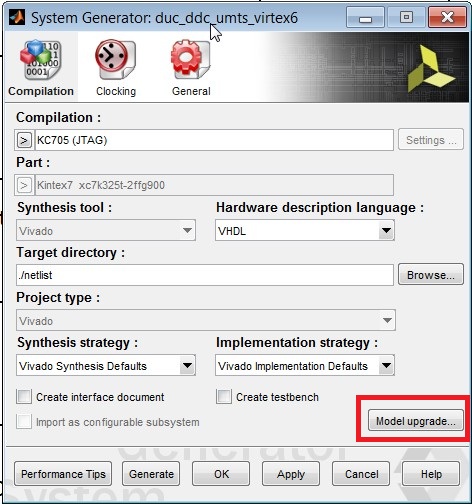
  4. Click the "Model Upgrade" button (Figure 1)
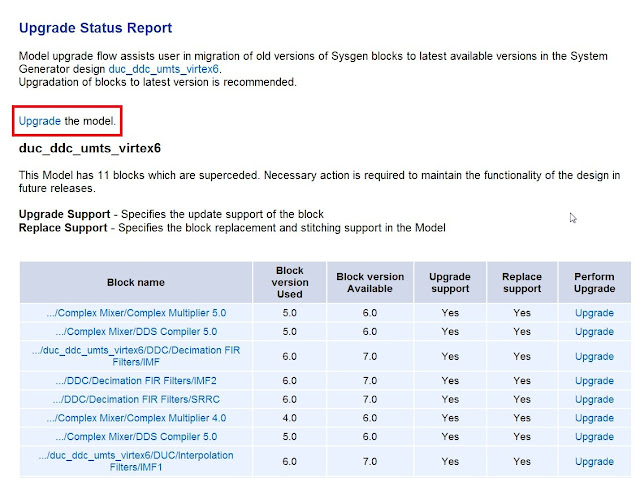
  5. A "Upgrade Status Report" window (Figure 2) will popup showing versions of blocks used in the current model, available versions for those blocks in the current SysGen version, and if they are upgradable (manual connection may be required) or replaceable (upgraded block will be automatically connected by the tool).
  6. Click "Upgrade the model" at the top of the report to upgrade the entire model or "Upgrade" in the "Perform Upgrade" column for each block to upgrade the corresponding block
  7. Go back to SysGen model and manually remove incompatible blocks.
  8. Save the upgraded model in IDS SysGen
Upgrade Model in Vivado SysGen:
  1. Open the upgraded model above in Vivado SysGen
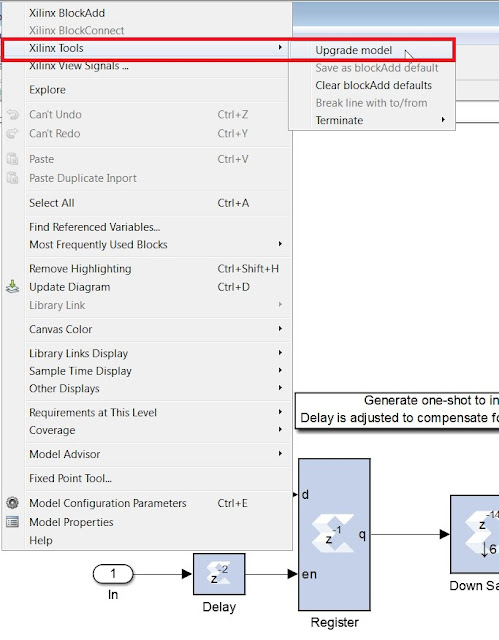
  2. Right click an empty area on the model and select  "Xilinx Tools->Upgrade model" (Figure 3)
  3. Save the model once the upgrade is done.
Figure 1. Model Upgrade button on IDS SysGen token

Figure 2. Upgrade Status Report in IDS SysGen

Figure 3: Upgrade model in Vivado SysGen

Sunday, May 5, 2013

Vivado IDE Legends

 
Legend for Sources->Hierarchy Window
Icon Descriptions
Top module
Partition
Local source: Files that were copied into the local project directory.
Remote source: Files that were not copied into the local project directory
Missing source: File that could not be located, either local or remote
Read-only source: Red square indicates a read-only file in the Vivado IDE.
 
Legend for IPs
Icon Descriptions
The current version of the IP is present in catalog
The current version of the IP is present in catalog and synthesis targets have been
generated

The IP is locked, with targets. The IP can be used, but it cannot be modified and new output products cannot be created. For example, Simulation targets, cannot be created if they are missing.
 The IP is locked with no targets. The IP cannot be used if:
° The IP can be upgraded to the current version in the IP catalog
° No upgrade option is available. You must recreate the IP.
° No upgrade option is available and the IP is no longer in the catalog. You must
bring in generated targets or the IP
 
Legend for Netlist Window
Icon Descriptions
Bus
I/O Bus
Net
 I/O Net
Hierarchical cell (logic)
Hierarchical cell (black box)
Hierarchical cell (assigned to a Pblock)
Hierarchical cell (black box assigned to a Pblock)
Primitive cell (assigned to a Pblock)
Primitive cell (placed and assigned to a Pblock)
Primitive cell (without assigned placement constraints)
Primitive cell (with assigned placement constraints)

Thursday, January 10, 2013

Quick Reference for Linux Development on ZC702

This blog serves as a quick reference of common and useful commands for Linux development on ZC702.  Check Xilinx Wiki site for more details.

VirtualBox VM (CentOS Recommended)
Assume vmshared is the shared directory name on the Windows host. The mount point on VM is /media/sf_vmshared

All make command lines assume the two environment variables are set in .bash_profile
export CROSS_COMPILE=arm-xilinx-linux-gnueabi-
export ARCH=arm


Create Zynq U-boot
git clone git://git.xilinx.com/u-boot-xlnx.git
cd u-boot-xlnx
make zynq_zc70x_config
make

Outputs:  
u-boot, u-boot.bin, u-boot.srec
u-boot-xlnx/tools/mkimage command. Make sure the path to it is added to PATH
 

Create Linux Kernel
git clone git://git.xilinx.com/linux-xlnx.git
cd linux-xlnx
git checkout xilinx-v14.4
make xilinx_zynq_defconfig
make uImage


Outputs:
Kernel: arch/arm/boot/uImage
Device tree compiler: scripts/dtc/dtc

Create Device Tree
cp arch/arm/boot/dts/zynq-zc702.dts /<any_path>
scripts/dtc/dtc -I dts -O dtb -o /<any_path>/devicetree.dtb /<any_path>/zynq-zc702.dts

Outputs:
Device tree: devicetree.dtb

Root File System
git clone git://git.busybox.net/busybox
cd busybox
make defconfig
make menuconfig
Install location=/home/devel/_rootfs (BusyBox Settings->Installation Options->BusyBox installation prefix)
make install


wget http://matt.ucc.asn.au/dropbear/releases/dropbear-0.53.1.tar.gz
tar xfvz dropbear-0.53.1.tar.gz
cd dropbear-0.53.1
./configure --prefix=/home/devel/_rootfs --host=arm-xilinx-linux-gnueabi --disable-zlib CC=arm-xilinx-linux-gnueabi-gcc LDFLAGS="-Wl,--gc-sections" CFLAGS="-ffunction-sections -fdata-sections -Os"
make PROGRAMS="dropbear dbclient dropbearkey dropbearconvert scp" MULTI=1 strip

sudo make install
ln -s ../../sbin/dropbear /home/devel/_rootfs/usr/bin/scp


Outputs:
Kernel: arch/arm/boot/uImage
Device tree compiler: scripts/dtc/dtc 


SD Card
Starting in 14.2, the SD Card is automatically mounted on /mnt during the boot process.
A user script init.sh can be created on the SD card, which will be automatically executed at the end of boot by /etc/init.d/rcS .


OSL Tags, Timestamps  
14.4 OSL
Git Tag:  xilinx-v14.7

14.4 OSL
Git Tag:  xilinx-v14.4
U-Boot 2012.10 (Dec 17 2012 - 10:57:07)

14.3 OSL
Git tag: xilinx-14.3-build2
U-Boot 2012.04.01-00304-g7639205 (Oct 23 2012 - 08:29:31)
Linux version 3.5.0-14.3-build2 

Useful Git Commands
Fetch the latest date from the remote repository
git pull

List all tags in the local repository
git tag


Check out a tagged release
git checkout tag_name


Check with tagged release is checked out
git describe --tags


Useful Linux Commands on ZC702

Manually set IP address for ZC702
ifconfig eth0 192.168.1.10 netmask 255.255.255.0 up

Copy files to the SD card: it is important to sync the data back to the disk or umount the card if needed
sync
umount /mnt

Check if CPU1 is online
less /sys/devices/system/cpu/cpu1/online